CCNA, CCENT, And Network+ Tutorial: The TCP / IP Networking Model
In the previous installment of this Introduction To Networking tutorial series, we took a detailed look at the OSI networking model. Today, we’ll work with the other major networking model, the TCP/IP model, including a discussion of practical use of these models when you’re studying for your Cisco and CompTIA certification exams.
This model originally had four layers, and the bottom layer caused a lot of anxiety among CCNA and CCENT candidates since that layer was actually known by three different names – and the name you saw depended on the book you were reading. Thankfully, those days are long gone.
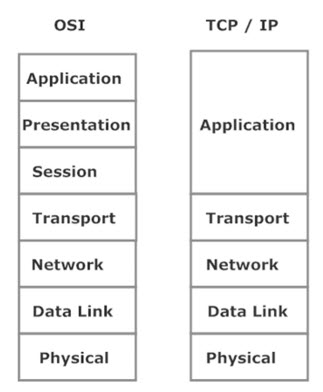
Not only has this model evolved into a five-layer model, but the bottom layer is now known by one simple name. Let’s have a look at all five layers and how this model maps to the OSI model.

The Application layer of the TCP/IP model does everything the Application, Presentation, and Session layers of the OSI model do. From that point on, the layers have the same names and our devices run at the same layers – routers at L3, switches at L2, cables at L1.
There are two natural questions at this point:
- Why do we need network models in the first place?
- Why do we have two major network models, especially when they’re so very similar?
One major benefit of using these models is that utilizing a given set of standards helps developers create products and programs that work well together. We’re all for that since we’re often called upon when those programs aren’t working well together.
There’s one other major benefit of particular interest to us as CCENT and CCNA candidates, and this benefit can make life a lot easier for you on exam day. You can use these models as a map to success on your exam, especially those bottom three layers. You’re responsible for a great many topics on your exams, and without a structured study plan, it’s easy to get lost on the way to success. It’s a lot easier to succeed with this simple three-part plan:
- Learn about the Physical layer first
- When you’re comfortable there, move up to the Data Link layer (switches)
- When you’re comfortable there, head on up to the Network layer (routers)
When you’re presented with any formidable task, the best way to succeed is to break the huge task down into smaller, more manageable jobs. That’s just what we’re doing with your studies, using the OSI and TCP/IP models as a roadmap to success.
Use these models for success in the real world, especially when it comes to troubleshooting. For many network admins, troubleshooting is the main part of the job, and using a network model as a map for this three-step troubleshooting approach will make you a world-class admin:
- Always t-shoot the Physical layer first. If the device in question isn’t getting power, it’s never going to work.
- Everything okay physically? Now start climbing the model and t-shoot Layer 2.
- Everything good there? Even better! Time to t-shoot Layer 3.
I guarantee this simple three-step process will make you a more efficient troubleshooter.
Now, why do we have two network models? While the OSI model isn’t the main model in use by today’s developers, we kept using the layer names because the TCP/IP model layer naming was originally crazy. (More on that in a moment.)
The OSI model is the result of merging two sets of international network standards, one developed by the International Organization for Standardization (ISO) and the other by the International Telegraph & Telephone Consultative Committee (CCITT, and yes, I know, the initials don’t match up). That merger took place in the early 1980s.
Meanwhile, the United States Department of Defense was developing its own networking model, the TCP/IP model. In a nutshell, TCP/IP took over the networking world, and this particular model became the standard networking model.
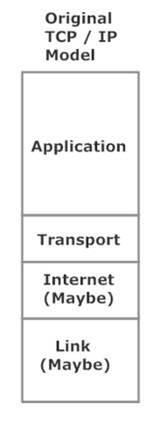
Then why do so many networking books, study guides, etc., still use the OSI model? Basically, it’s because we started using the OSI layer names a long time ago (the 1980s, that is), and the TCP/IP model layers used to have very different names, not to mention multiple names. Here’s the original TCP/IP model with a little original commentary from yours truly.

Not only did the original TCP/IP model combine the Physical and Data Link layers into one layer, but the bottom two layers were often referred to by different names. That really helped clear things up. The Internet layer was sometimes called the Network layer, and the Link layer was called both the Network Interface and Network Access layer. I kid you not! Just Google “TCP/IP model,” click on the “Images” tag, and you’ll see plenty of illustrations that used these names.
Thankfully, the TCP/IP model now uses the same names as the OSI layer, with the only real difference being the TCP/IP Application layer handling the same tasks as the OSI model’s top three layers.
Whew! There’s a lot to take in there, but it’ll all pay off when you pass your CCNA, CCENT, and Network+ exams. Take a breath and then tackle the next installment, where we’ll discuss Ethernet cable standards and usage.
While you’re at it, head over to Amazon and grab a copy of my new Binary, Subnetting, and Summarization Mastery guide. Purchase the paperback edition and get the soft copy free! (Amazon limits this offer to U.S. customers.)


