CCNP ROUTE Tutorial and Lab: How and Why To Tag Routes
In the previous CCNP ROUTE redistribution lab (one of my best ever, he said humbly), I introduced you to route-maps and several set attributes that we found quite helpful. Today we’re going to do some route tagging, and the tag itself is in the middle of all those set attributes.
(If you’re unfamiliar with route maps, you might want to read the previous lab to follow this one. When you’re done here, head over to my full CCNP ROUTE Redistribution tutorial series.)
Here’s where the tag option is found:
R1(config)#route-map OSPF2RIPDOMAIN permit 20

R1(config-route-map)#set ?

  as-path           Prepend string for a BGP AS-path attribute

  automatic-tag     Automatically compute TAG value

  clns              OSI summary address

  comm-list         set BGP community list (for deletion)

  community         BGP community attribute

  dampening         Set BGP route flap dampening parameters

  default           Set default information

  extcommunity      BGP extended community attribute

  interface         Output interface

  ip                IP specific information

  ipv6              IPv6 specific information

  level             Where to import route

  local-preference  BGP local preference path attribute

  metric            Metric value for destination routing protocol

  metric-type       Type of metric for destination routing protocol

  mpls-label        Set MPLS label for prefix

  nlri              BGP NLRI type

  origin            BGP origin code

  tag               Tag value for destination routing protocol

  traffic-index     BGP traffic classification number for accounting

  vrf               Define VRF name

  weight            BGP weight for routing table
That little value helps to prevent some big nasty routing loops, especially with 2-way route redistribution in place. You can tag routes with a number as they’re redistributed and then prohibit routes with that same value from being “re-redistributed” back into the original routing protocol.
Here’s the topology for this lab:
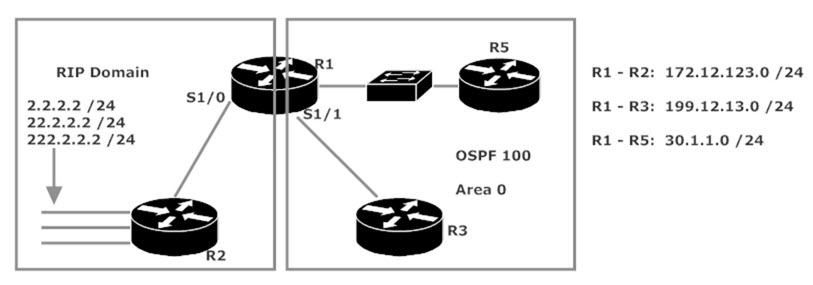
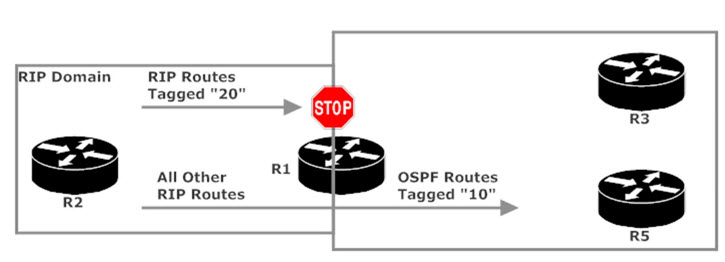
We’re getting ready to configure two-way redistribution, and we want to make absolutely sure routes redistributed into OSPF cannot be brought back into the RIP domains, and vice versa. That includes the possibility of additional border routers being added later.
As routes are redistributed into OSPF, we can tag them with a numeric value of our choice, and then deny values with that same tag from being redistributed back into the RIP domain.
R1 has the three RIP routes advertised by R2:
R1#show ip route rip

R    222.2.2.0/24 [120/1] via 172.12.123.2, 00:00:02, Serial1/0

R    2.0.0.0/8 [120/1] via 172.12.123.2, 00:00:02, Serial1/0

R    22.0.0.0/8 [120/1] via 172.12.123.2, 00:00:02, Serial1/0
To tag all redistributed routes as they go into OSPF, no match statement is needed – just this simple route-map.
R1(config)#route-map RIP2OSPF permit 10

R1(config-route-map)#set tag 10

R1(config-route-map)#exit
_________________________________________________________
Chris Bryant’s CCNP ROUTE Study Guide on Amazon
Cisco Press CCNP ROUTE Study Guide on Amazon
Check ’em both out!
__________________________________________
Now for the redistribution itself.
R1(config)#router ospf 1

R1(config-router)#redis rip route-map RIP2OSPF subnets

R1(config-router)#redis connected subnets
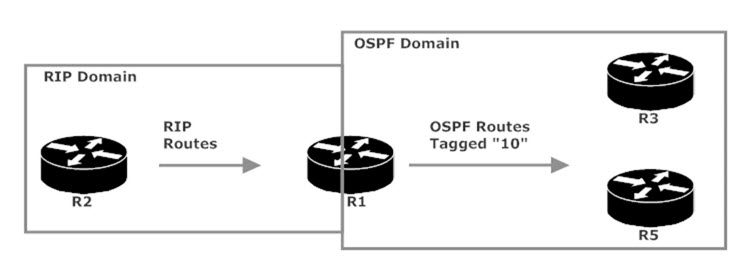
The RIP routes become OSPF E2 routes (the default for routes redistributed into OSPF), and they’re tagged with the value “10”. I trust that, but we really should verify, don’t you think?
The route tables on R3 and R5 will be the same, so for simplicity’s sake we’ll concentrate on R3. Let’s check the OSPF table for R3 for the routes and the tag values.
R3#show ip route ospf

O E2  2.0.0.0/8 [110/20] via 172.12.13.1, 00:00:31, Serial0/1/0

O E2  22.0.0.0/8 [110/20] via 172.12.13.1, 00:00:31, Serial0/1/0

      30.0.0.0/24 is subnetted, 1 subnets

O        30.1.1.0 [110/65] via 172.12.13.1, 00:00:26, Serial0/1/0

      172.12.0.0/16 is variably subnetted, 3 subnets, 2 masks

O E2     172.12.123.0/24 [110/20] via 172.12.13.1, 00:00:31, Serial0/1/0

O E2  222.2.2.0/24 [110/20] via 172.12.13.1, 00:00:31, Serial0/1/0
All three tagged routes appear along with the internal 30.1.1.0 /24 network and the connected-to-R1 network 172.12.123.0 /24. You won’t see the tags in the routing table, but you will see them with the extended show ip route command. I’ll run the command four times, one for each OSPF E2 route.
R3#show ip route 2.2.2.0

Routing entry for 2.0.0.0/8

  Known via "ospf 1", distance 110, metric 20

  Tag 10, type extern 2, forward metric 64

  Last update from 172.12.13.1 on Serial0/1/0, 00:02:58 ago

  Routing Descriptor Blocks:

  * 172.12.13.1, from 172.12.123.1, 00:02:58 ago, via Serial0/1/0

      Route metric is 20, traffic share count is 1

      Route tag 10
R3#show ip route 22.2.2.0

Routing entry for 22.0.0.0/8

  Known via "ospf 1", distance 110, metric 20

  Tag 10, type extern 2, forward metric 64

  Last update from 172.12.13.1 on Serial0/1/0, 00:03:04 ago

  Routing Descriptor Blocks:

  * 172.12.13.1, from 172.12.123.1, 00:03:04 ago, via Serial0/1/0

      Route metric is 20, traffic share count is 1

      Route tag 10
R3#show ip route 222.2.2.0

Routing entry for 222.2.2.0/24

  Known via "ospf 1", distance 110, metric 20

  Tag 10, type extern 2, forward metric 64

  Last update from 172.12.13.1 on Serial0/1/0, 00:03:09 ago

  Routing Descriptor Blocks:

  * 172.12.13.1, from 172.12.123.1, 00:03:09 ago, via Serial0/1/0

      Route metric is 20, traffic share count is 1

      Route tag 10
R3#show ip route 172.12.123.0

Routing entry for 172.12.123.0/24

  Known via "ospf 1", distance 110, metric 20, type extern 2, forward metric 64

  Last update from 172.12.13.1 on Serial0/1/0, 00:03:14 ago

  Routing Descriptor Blocks:

  * 172.12.13.1, from 172.12.123.1, 00:03:14 ago, via Serial0/1/0

     Route metric is 20, traffic share count is 1
Why wasn’t 172.12.123.0 /24 tagged? Let’s revisit the topology and the redistribution configuration.

R1(config)#router ospf 1

R1(config-router)#redis rip route-map RIP2OSPF subnets

R1(config-router)#redis connected subnets
The 172.12.123.0 /24 network was not learned by R1 by using RIP. It’s a directly connected network, and we didn’t apply the route-map to the redistribution of connected routes. If we wanted the connected routes tagged, all we’d need to do is apply the RIP2OSPF route-map to the redistribute connected subnets command.
Now to tag our routes going from OSPF to RIP. The following route-map will do two things:
- Prevent any routes tagged “10” from being redistributed back into RIP via the deny in the first route-map clause.
- Allow untagged routes to be redistributed and tag them “20” as that’s done.
R1(config)#route-map OSPF2RIP deny 10

R1(config-route-map)#match tag 10

R1(config-route-map)#route-map OSPF2RIP permit 20

R1(config-route-map)#set tag 20
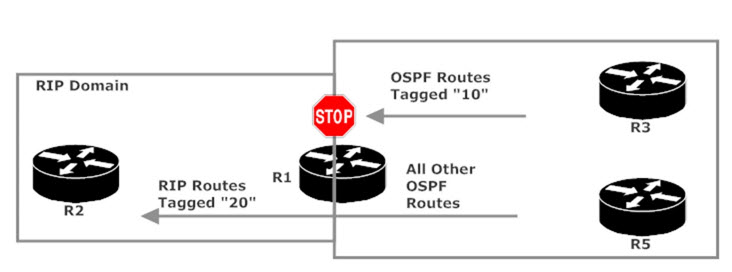
If we now want to go back to the RIP2OSPF route map and use that tag of 20 to prevent routes from being advertised back to OSPF… well, let’s have a look at that route map first.
R1#show route-map RIP2OSPF

route-map RIP2OSPF, permit, sequence 10

  Match clauses:

  Set clauses:

    tag 10

  Policy routing matches: 0 packets, 0 bytes
We need the new clause to have a sequence number of less than 10. Why? We need this deny clause in front of the current clause, which allows all routes and tags them with 10. If we enter the deny clause without a sequence number, it’ll be assigned 20 and it’ll never be applied, since clause 10 matches everything.
We’ll write the new clause with a sequence number of five and then verify with show route-map RIP2OSPF.
R1(config)#route-map RIP2OSPF deny 5

R1(config-route-map)#match tag 20


R1#show route-map RIP2OSPF

route-map RIP2OSPF, deny, sequence 5

  Match clauses:

    tag 20

  Set clauses:

  Policy routing matches: 0 packets, 0 bytes

route-map RIP2OSPF, permit, sequence 10

  Match clauses:

  Set clauses:

    tag 10

  Policy routing matches: 0 packets, 0 bytes
Now we’re in business. Just as with ACLs, the order of the lines in a route-map is vital. Sequence numbers make it easy to keep your lines in line!
Coming up next in this CCNP ROUTE Redistribution Course — policy routing. I’ll post that on Saturday, August 18, 2018. Right now, follow that link over to the main page for this course, where you’ll find links to every lesson in the course.
Thanks for making my work part of your CCNP success story!
Chris Bryant, CCIE #12933 on Twitter
_________________________________________________________
Chris Bryant’s CCNP ROUTE Study Guide on Amazon
Cisco Press CCNP ROUTE Study Guide on Amazon
Check ’em both out!
__________________________________________


